| Simulations/ Explosions |
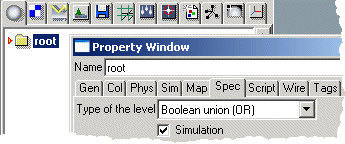
ExplosionsExploding sphereIn this example we will set up a simple simulation where a sphere explodes after a certain period of time. 1. Select the root object and open the property window. Go to the 'Spec' tab and activate the 'Simulation' check box.
This enables simulations for all objects directly under the 'root' level. You can also activate the simulation through the tool control bar. 2. Create a sphere, open its property window and go to the 'Sim' tab. Set the 'Explode Time' field to an appropriate value (in current time units, frames or seconds).
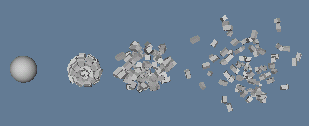
Play the animation. Sphere will explode after ten frames.
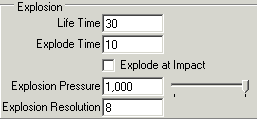
This effect breaks the exploding object to a number of pieces. The number of explosion parts can be controlled through the 'Explosion resolution' field. The 'Explosion pressure' parameter defines the strength of the explosion. The higher the value, the higher the velocity of the explosion parts. The 'Life Time' field can be used for controlling how long the exploded parts remain alive. Explode at impactIn addition to a specified time, objects can be exploded by collisions. For example, you can create a gun, which shoots exploding bullets. To create a simulation where a bullet explodes its target object: 1. Create two spheres: one representing a bullet and one representing a target. 2. Use the Simulation/Velocity tool to define an initial velocity for the bullet so that it will finally hit the target sphere. 3. Select both spheres and set 'Collision Detection' to 'Both' in the 'Sim' tab. 4. Set 'Explode at Impact' option for the target. Make sure the 'Simulation' option is activated in the level containing the spheres and play the animation. As soon as the bullet hits the target, the target explodes. Explode at a specified timeExplosion is controlled by an 'Explode' attribute. As soon as this attribute is set, the object explodes. 'Explosion Time' and 'Explode at Impact' options simply set this attribute when a certain time is elapsed or when a collision is detected. The Explode attribute can be animated in a way similar to animating other attributes. For example, if you want a sphere to explode at frame 30: 1. Create a sphere and make it choreographable by applying the menu 'Make Choreographable' from the select window's popup. 2. Open the Choreography window. In the Time Lines tab, select the Sphere.Init0 choreography. Then select New/Keyframer from the popup menu. Open the sub struture of the Init choreography to see the inserted keyframe object. Click the keyframer object to select it. 3. Go to the Animateable Attributes tab. Select the Explode attribute and set the Animated option. 4. In the Properties tab, open the keyframer object and click on the Explode attribute under it. Right click in the graph window and select Set Minimum and maximum values from the popup menu. Make sure that Min x and Max x values match the length of your animation: Min X=0, : Max X = the number of frames in the animation. Make sure that the maximum value for Y = 1. 5. Select Create predefined curve/Constant curve from the popup menu. Add one point to the created curve by dragging the curve. Because the type of the Explode attribute is Boolean, also the type of the created curve is Boolean. Drag the added point to the value 1.0 at frame 30 (X = 30). Now, when time reaches frame 30, the explode attribute value goes up to 1 and the sphere explodes. Make sure the parent level's Simulated option is set and play the animation to see an explosion.
Explode at other eventsAs you already know, the animation system allows you to animate 'anything as a function of anything'. This is also true for explosions. However, it usually does not make much sense to key frame the explode attribute, because as soon as the explode key frame curve goes up, the object dies taking all the key frame curves with it. There are numerous cases where the explode option should be controlled by another object attribute. For example, you might want to explode an object as soon as its speed exceeds a certain limit. To achieve this, animate 'Explode' as a function of 'Speed'. Or, you might want to explode an object as soon as its 'y' coordinate reaches a certain upper limit. In this case, animate the 'Explode' attribute by the 'TranslationY' attribute. Let's create an animation where an object explodes as soon as it moves below the ground plane, in other words, when its y coordinate gets smaller than zero. The 'Explode' attribute will not be animated in time but by the 'y' coordinate of the object. 1. Create a sphere and apply 'Make Choreographable' to it from the select window's popup. 2. Open the Choreography window and select the sphere's base choreography 'sphere.init0'. 3. Select New/Keyframer from the popup menu of the choreography list. Open the sub structure of the Sphere.init0 choreography and activate the new keyframer choreography. 4. Go to the Input tab of the choreography window. Drag the sphere object from the select window and drop it on the keyframer object in the choreography window. This instructs the choreography to use one of the sphere's attributes for input. Select 'Center.y' from the 'Attribute' list. We are now ready to animate the 'Explode' attribute as a function of the sphere's y coordinate. 5. Go to the 'Animateable Attributes' tab. Set the 'Animated' option for the 'Explode' property. Then go to the 'Properties' tab and click on the Explode attribute under the Keyframer choreography. 6. Now select 'Create predefined curve/Constant curve' from the curve gadget's popup menu at the right side of the Choreography window.Select 'Set Minimum and Maximum values' from the curve gadget's popup. Define 'Min X' = -1, 'Max X' = 1 (this is the input parameter range i.e. the y coordinate of the sphere center). Define 'Min Y' = 0, 'Max Y' = 1. The vertical Y-axis controls the state of 'Explode' attribute. Check the 'Rescale' box and close the scaling dialog from the 'OK' button. Then define the curve shown below: 'Explode' is 1 when 'Center.y' is below 0 7. Use the Simulation/Velocity tool to define an initial velocity for the sphere, making it fall downwards. 8. Activate 'Simulation' on the parent object of the sphere. Play the animation. The sphere moves down and when it reaches the ground plane, it explodes.
|
 |
 |


